How to Safely Work with Lead-Based Paint
Next to asbestos, the idea of lead-based paint puts a chill in the heart of potential homebuyers, current home dwellers, and particularly do-it-yourselfers remodeling their own homes. Awareness of the dangers of lead-based paint began in the 1970s, after the Environmental Protection Agency (EPA) announcement that ingestion of lead-based paint may cause severe learning disabilities, behavioral problems, seizures, and even death. These warnings are red flags for anyone owning an old home pre-dating 1978 when lead-based paint was banned from being sold in the U.S.
But lead-based paint on a home does not mean that the lead-based paint cannot be encapsulated with new paint or that it cannot be scraped, sanded, and then painted. It simply means that a different set of precautions must be heeded when taking on this project in order to do it safely for both the worker and for the home’s occupants.
Lead-Based Paint: Legacy of Protection and Poisoning
Lead has long been used as a component in paint, and as one of the chief components of water pipes, as far back as the Roman Empire. Among its many uses, lead was also used as an additive to wine, because of its slightly sweet taste, as well as an element contained in many cooking utensils and vessels.
Knowing what we know now about the poisonous capability of lead, it should come as no surprise that the effects of lead poisoning have been far-reaching. Some historians even suggest that the fall of the Roman Empire can be partially attributed to the presence of lead poisoning in so many of its leaders and citizens.
However distressing it may be to discover the presence of lead-based paint in a home, there are ways to live and work with it. The most important thing to remember is that as long as the paint remains solid, it will not harm you. Merely touching a painted surface or being in the immediate area of lead-based paint will not cause adverse effects.
People and Houses That Are Most Affected by Lead-Based Paint
Everyone, but mostly children, can be harmed by lead-based paint. Lead-based paint appears to mainly affect children age six and under, although adults may experience problems with pregnancy as well as neurological conditions, which range from the cumulative and chronic effects of exposure to lead, including acute conditions such as renal failure and encephalopathy. Thankfully, elevated blood-lead levels have dropped dramatically since 1978, due mainly to aggressive education efforts from the EPA, state, and local agencies

The Process of Installing Replacement Windows
Installing new replacement windows is a process that most homeowners go through only once or twice in their lifetimes, so it is normal not to have the slightest clue of what happens. Here is a highly generalized account of what you might expect when a full-service company replaces your windows.
Should You Stay Home?
If you can take off time from work or can work from home, do so. Whole-house window installation is highly invasive, affecting every room of your house. The window company will assure you that you do not need to stay home, but this is always a good idea to keep work in line and to keep an eye on valuables.
How Closely Should You Monitor the Workers?
The best advice for managing a work crew in your home is to be within calling distance if they have questions, but do not hover. You get the best results if the foreman can call on you as a resource (which, in practice, will not happen much) while giving the crew space to do their best work.
Before Installers Arrive
Touch bases with the salesperson or scheduler and confirm installation date and time.
Have unique needs? Place Post-it notes on the wall next to the windows to be replaced, specifying special instructions. For example: “Please save old window.”
Remove Old Windows and Begin Replacement on Day 1
Meet the job foreman and walk through the house, going over each window. This is your chance to catch any errors the window company may have made in ordering your windows.
If this is a multi-person crew, one set of installers will bring in windows as another set of installers removes windows.
Walk through the house on your own to ensure that installers have put down drop cloths inside.
Optional: Add drop cloths outside if you have flower beds that you wish to preserve. Inside, dust barriers might be set up, but this is not really necessary, as window installation does not create much dust.
As removal continues, installation proceeds. Ropes for the window sash weights are cut. Weights drop to the bottom of the window pocket. New windows are set in place and leveled with shims. With the window level, it is nailed into place.
Installers periodically move old windows outside; the stack of old windows grows.
The installers are now in a groove of removing and replacing. There is little need for supervision, but it is always a good idea to touch base with the foreman.
Depending on the size of the installation crew, by the end of the day, you might expect up to 10 windows to be done. You do not want any windows to be boarded over. Insist that each window space is replaced with a new window or left in place with the old window.
No tools should be left in your house. Rooms are broom-clean. Old windows outside are removed.
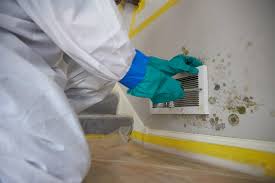
Types of Mold and How to Remove Them
There’s a fungus among us and it is mold. Mold spores are everywhere and when they find moisture and moderate temperatures (60 to 80 degrees Fahrenheit), they thrive and grow. While some fungi are beneficial, many can be dangerous to the health of humans and destructive to property.
The more common molds that most homeowners encounter can be classified into three categories: allergenic, pathogenic, and toxic.
Allergenic molds affect the 20 to 30 percent of the population who are susceptible to mold allergens. While extreme infestations can require removal by a professional, most allergenic molds can be removed with home disinfecting products.
Pathogenic molds cause disease and infection especially in young children and adults with compromised immune systems. Small infestations can be controlled with disinfectants but large colonies require professional removal.
Toxic molds produce poisonous chemicals called mycotoxins that intentionally harm any living organism including humans and animals. These are quite deadly and require a professional to kill the mold and dispose of any affected materials.
Once mold is discovered, you should hire a professional or use our guide to help identify the 12 most common types of fungi and develop a plan for removal. Once the mold is removed, it is essential to identify the moisture problem that led to the growth.
DIY Mold Cleaning Methods
If allergenic molds are caught early, you can easily remove them with household disinfectants. When using any of these products, make sure there is adequate ventilation in the area and wear protective gear like gloves, eye protection, and old clothes that can be washed in hot water to kill stray spores.
Chlorine bleach: Sodium hypochlorite or regular household bleach works best to destroy mold and remove any discoloration. It is quite harsh and should be diluted before using.
Hydrogen peroxide: Less harsh than chlorine bleach, hydrogen peroxide (three to 10 percent solution) will kill mold and lighten stains. While it does have a bleaching effect, it works more slowly than chlorine bleach but has no toxic fumes or residue.
Distilled white vinegar: Vinegar is acidic and slowly breaks down the structure of mold and kills it. Vinegar is non-toxic but mold stains may remain and additional scrubbing with a household cleaner may be needed.
Baking soda and borax: Sodium bicarbonate (baking soda) and borax each have a high pH that inhibits the growth and survival of mold. Both products are inexpensive, non-toxic, and easy to mix with water. Borax is more effective than baking soda but not as effect as a stronger cleaning product.
How to Use a Vapor Barrier to Control Moisture in a Crawl Space
Combatting moisture is a part of life for most homeowners. While nearly everyone is familiar with moisture problems due to faulty or damaged roofs and walls, or from rainwater runoff that seeps into foundations or up through concrete foundation floors, homes built over crawl spaces deal with moisture from another source: water vapor that rises naturally from the exposed soil and becomes trapped in the enclosed crawl space.
Problems Caused by Moisture
Moisture is one of the main foes of a home’s structure—potentially causing both structural problems and health issues. Uncontrolled moisture can cause rot and decay in wood framing and other materials, and it fosters mold and mildew that can cause allergies and asthma. The amount of moisture that is present determines if you can finish a basement, for example. Moisture also determines what type of below-grade flooring you are able to install. At its most extreme, moisture can even determine if the construction of a home or room addition is possible at all. Where moisture is a known problem, vapor barriers are integrated into wall, ceiling, and floor construction to combat the effects.
Mold and Mildew
One of the most serious problems caused by moisture is mold, mildew, and other fungi. According to the CDC, mold can cause nasal stuffiness, throat irritation, coughing or wheezing, eye irritation, and skin irritation to people with sensitivities. And people with mold allergies can have much more severe reactions, including lung infections. Eliminating mold is difficult, and fully remediating mold-related problems is expensive. Mold’s effects go well beyond just harming people. As a direct byproduct of crawl space moisture, mold can blacken floor cavity insulation and structural elements. Because there is often no light and only minimal ventilation in a crawl space, the problem never improves unless preventive or remediation methods are enacted.
Rot
Structural elements of your house, such as joists, sills, posts, and beams, are made of wood. Being an organic material, wood will begin to rot when it comes into contact with water for prolonged periods.
Rodents and Other Vermin
Animals of many types are drawn to water and can infest your home. These pests include carpenter ants, termites, rats, mice, snakes—even skunks and armadillos.
The Best Cleaners for Your Outdoor Deck
Some experts recommend that homeowners should clean their decks at least twice a year—preferably in the spring and fall. The safest, most environmental way to clean a deck is to not clean it at all, eliminating the chance of toxic chemicals being introduced into the environment and water. Sure, you could raze the deck completely, getting rid of all of that moldy, mildewed wood, recycling it and making it someone else’s problem, and then start all over again by building a new one. But that’s not always possible, nor is it the best or most feasible choice.
Baking Soda, Vinegar and Dish Soap
Everyone’s favorite natural cleaners can be used on the outdoor deck to tackle mildew and algae. Here’s the recipe:
Box of baking soda
1 cup of vinegar
2 Tablespoons (T) of mild dishwashing liquid/soap (not the stuff for your dishwasher)
1 gallon of water
Sprinkle baking soda on affected areas of deck. Mix vinegar, soap, and water in a bucket, apply to one section of mildew-infested decking, and scrub with a brush until you see results. This method may have to be repeated for a thorough job.
Borax
Like baking soda and vinegar, borate is an all-purpose natural cleaner that is versatile around the house and yard. Using a ratio of one cup of Borax to one gallon of water, address small areas of your deck at a time, scrubbing with a brush to remove algae and mildew.
Bleach
It’s not the most environmental choice, but chlorine does a good job of tackling standing water, mold and mildew (if you have a swimming pool, you get it). Read directions and labels, use gloves and masks, and only with proper ventilation.
Pressure or Power Washer
In case you’ve never noticed, some people just love their pressure washers. Crank it up and blast it with the pressure washer, and what a thrill it is to watch the paint peel off the facade of your house or the dirt melt from the fence between your house and the neighbor. It’s all that firefighter/action hero stuff re-enacted in your own yard.